
前回で、Webスクレイピングの必須スキル「page.locator()とサイトのPage情報確認方法」を学んだようじゃのう。では、さっそく実践じゃ、つまづきながらでいいのでファイトじゃ!
問題① タイトルとテーブル情報の抽出
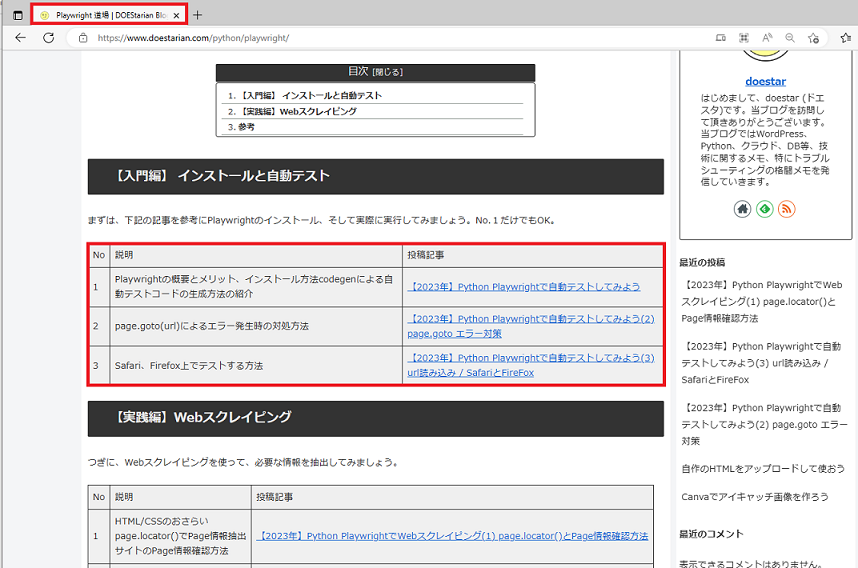
下記のURLを指定して以下の2つの情報を抜き出してください。
https://www.doestarian.com/python/playwright/
| ① タイトル名 | Playwright 道場 | DOEStarian Blog |
| ② テーブル情報 (入門編)* | No. / 説明 / 投稿記事のURL |
出力結果はつぎのとおりです。
Title:
Playwright 道場  |  DOEStarian Blog

Table:
No , 説明, 投稿記事
1 , Playwrightの概要とメリット、インストール方法codegenによる自動テストコードの生成方法の紹介, https://www.doestarian.com/python-playwright%e3%81%a7%e8%87%aa%e5%8b%95%e3%83%86%e3%82%b9%e3%83%88%e3%81%97%e3%81%a6%e3%81%bf%e3%82%8b/
2 , page.goto(url)によるエラー発生時の対処方法, https://www.doestarian.com/2023-playwright-test2-error/
3 , Safari、Firefox上でテストする方法, https://www.doestarian.com/2023-playwright-test3-url-browser/
解説
TableのCSS selector 調査
Titleは前回説明したとおり、下記のように”title”指定で情報をとることができました。
# Title抽出
title = page.locator("title").inner_text()
では、テーブル情報はどのようにとればいいのでしょうか?
Title抽出のときと同様にTableのCSS selector(以下、selector)を調査してみましょう。
まずは、対象のテーブルのヘッダー情報(No、説明、投稿記事)を調査。
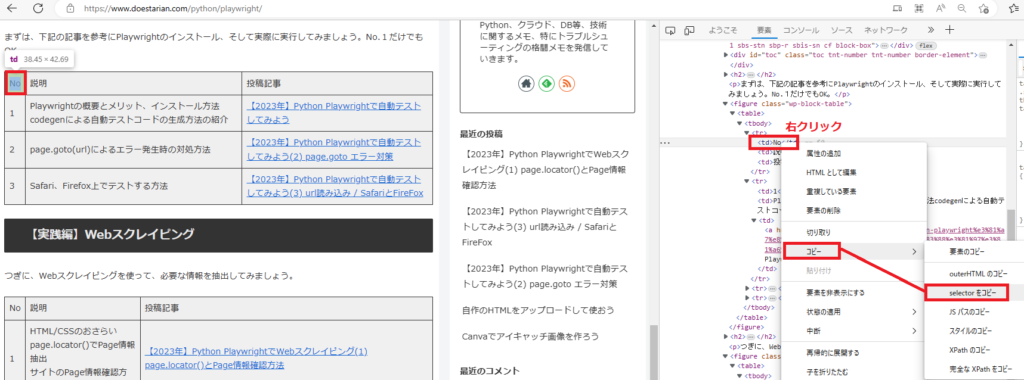
下記のように最後のtd:nth-child(1)の部分が変更されていることが確認できました。
| No | #post-93 > div > figure:nth-child(6) > table > tbody > tr:nth-child(1) > td:nth-child(1) |
| 説明 | #post-93 > div > figure:nth-child(6) > table > tbody > tr:nth-child(1) > td:nth-child(2) |
| 投稿記事 | #post-93 > div > figure:nth-child(6) > table > tbody > tr:nth-child(1) > td:nth-child(3) |
次に、2行目(1つ目の投稿記事)のテーブル情報のselectorを調査してみましょう
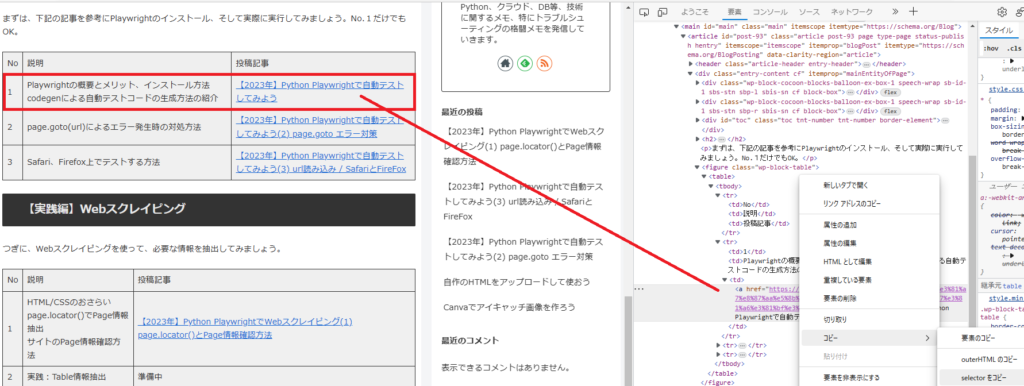
今度は、tr:nth-child(1)の部分がtr:nth-child(2)に変更されていることが確認できました。
また、投稿記事のリンクに関しては<a>タグが付与されていることも確認できました。
| 1 | #post-93 > div > figure:nth-child(6) > table > tbody > tr:nth-child(2) > td:nth-child(1) |
| Playwrightの概要… | #post-93 > div > figure:nth-child(6) > table > tbody > tr:nth-child(2) > td:nth-child(2) |
| 【2023年】Python... | #post-93 > div > figure:nth-child(6) > table > tbody > tr:nth-child(2) > td:nth-child(3) > a |
もう一つ確認してみましょう。
【実践編】Webスクレイピングのテーブルのヘッダー情報(No、説明、投稿記事)はどうでしょう?
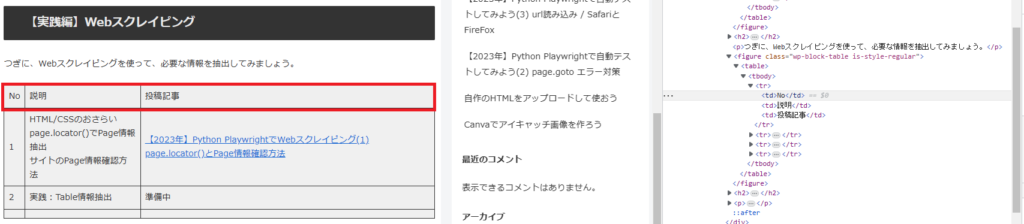
figure:nth-child(6)の部分が、figure.wp-block-table.is-style-regular に変更されてました。
| No | #post-93 > div > figure.wp-block-table.is-style-regular > table > tbody > tr:nth-child(1) > td:nth-child(1) |
| 説明 | #post-93 > div > figure.wp-block-table.is-style-regular > table > tbody > tr:nth-child(1) > td:nth-child(2) |
| 投稿記事 | #post-93 > div > figure.wp-block-table.is-style-regular > table > tbody > tr:nth-child(1) > td:nth-child(3) |
selectorの指定は、調査対象のselector以降の情報を指定すればよいです。
したがって、下記の対象テーブル情報を取得したい場合は、
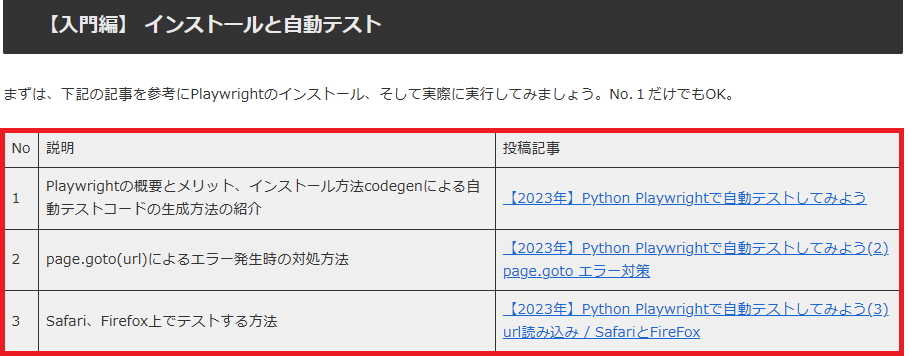
figure:nth-child(6) > table > tbody > tr:nth-child(1) > td:nth-child(1)
のようにfigure:nth-child(6)以降を指定すればよいです。
テーブル情報の抽出 (リンク:get_attribute)
次に、実際のテーブル情報を取得する場合について考えましょう。
例えば、 No.1の説明部分「Playwrightの概要と…」のテキストを抽出したい場合は
| No | 説明 | 投稿記事 |
| 1 | Playwrightの概要とメリット、インストール方法codegenによる自動テストコードの生成方法の紹介 | 【2023年】Python Playwrightで自動テストしてみよう |
このように書けばOKですね。
# 説明
overview = page.locator('figure:nth-child(6) > table > tbody > tr:nth-child(2) > td:nth-child(2)').inner_text()では、【2023年】Python Playwrightで自動テストしてみよう の部分はどうでしょうか?
figure:nth-child(6) > table > tbody > tr:nth-child(2) > td:nth-child(3) > a
テーブルのHTMLコードを見てみましょう。
 <tbody>
  <tr>
  <td>No</td>
  <td>説明</td>
  <td>投稿記事</td>
 </tr>
 <tr>
  <td>1</td>
  <td>Playwrightの概要とメリット、インストール方法codegenによる自動テストコードの生成方法の紹介</td>
  <td><a href="https://www.doestarian.com/python-playwright%e3%81%a7%e8%87%aa%e5%8b%95%e3%83%86%e3%82%b9%e3%83%88%e3%81%97%e3%81%a6%e3%81%bf%e3%82%8b/" target="_blank">
【2023年】Python Playwrightで自動テストしてみよう</a></td>
 </tr>
...
 </tbody>
リンク先のURLが、
<a href=”http…”> 【2023年】Python Playwrightで自動テストしてみよう</a>
のように<a>タグ内に記述されています。
このタグ内の情報を属性といいます。今回の場合は、aタグのhref属性といった感じですね。
今回のように属性情報を取得したい場合は、get_attribute()メソッドを使います。
# 投稿記事
url = page.locator('figure:nth-child(6) > table > tbody > tr:nth-child(2) > td:nth-child(3) > a').get_attribute('href')
解答例 ①
今回は、入門編の投稿記事が増えないことを前提につくってみました。
from playwright.sync_api import Playwright, sync_playwright, expect


def run(playwright: Playwright) -> None:
    browser = playwright.chromium.launch(headless=True)
    context = browser.new_context()

    # Open new page
    page = context.new_page()

    # Go to https://www.doestarian.com/python/playwright/
    page.goto("https://www.doestarian.com/python/playwright/")

    # Title取得
    title = page.locator("title").inner_text()
    print(f'Title:\n {title}\n')

    # テーブル情報(入門編)を取得
    print('Table:')
    # テーブルヘッダ
    no       = page.locator('figure:nth-child(6) > table > tbody > tr:nth-child(1) > td:nth-child(1)').inner_text()
    overview = page.locator('figure:nth-child(6) > table > tbody > tr:nth-child(1) > td:nth-child(2)').inner_text()
    url      = page.locator('figure:nth-child(6) > table > tbody > tr:nth-child(1) > td:nth-child(3)').inner_text()
    print(f'{no} , {overview}, {url}')

    # No.1
    no       = page.locator('figure:nth-child(6) > table > tbody > tr:nth-child(2) > td:nth-child(1)').inner_text()
    overview = page.locator('figure:nth-child(6) > table > tbody > tr:nth-child(2) > td:nth-child(2)').inner_text()
    url      = page.locator('figure:nth-child(6) > table > tbody > tr:nth-child(2) > td:nth-child(3) > a').get_attribute('href')
    print(f'{no} , {overview}, {url}')

    # No.2
    no       = page.locator('figure:nth-child(6) > table > tbody > tr:nth-child(3) > td:nth-child(1)').inner_text()
    overview = page.locator('figure:nth-child(6) > table > tbody > tr:nth-child(3) > td:nth-child(2)').inner_text()
    url      = page.locator('figure:nth-child(6) > table > tbody > tr:nth-child(3) > td:nth-child(3) > a').get_attribute('href')
    print(f'{no} , {overview}, {url}')

    # No.3
    no       = page.locator('figure:nth-child(6) > table > tbody > tr:nth-child(4) > td:nth-child(1)').inner_text()
    overview = page.locator('figure:nth-child(6) > table > tbody > tr:nth-child(4) > td:nth-child(2)').inner_text()
    url      = page.locator('figure:nth-child(6) > table > tbody > tr:nth-child(4) > td:nth-child(3) > a').get_attribute('href')
    print(f'{no} , {overview}, {url}')

    # Close page
    page.close()

    # ---------------------
    context.close()
    browser.close()


with sync_playwright() as playwright:
    run(playwright)

解答例 ②(投稿記事が増えても対応)
入門編の記事が増えたら対応できなくなりますよね。
投稿記事が増えても対応できるようにしましょう。
実は、つぎのように書くとテーブル情報内のテキスト情報を一気に取得することができるんです。
# 入門編のテキスト取得
table_str = page.locator('figure:nth-child(6) > table').inner_text()
# or
table_str = page.locator('table',has_text="自動テスト").inner_text()
1つ目:入門編のテーブルselectorを直接指定
2つ目:”自動テスト”と書かれているテーブルselectorの情報を抽出
■投稿数の調査(+テキスト出力)
# 投稿数とテーブルテキスト取得
# table_str = page.locator('figure:nth-child(6) > table').inner_text()
table_str = page.locator('table',has_text="自動テスト").inner_text()
count_posts = len(table_str.splitlines())-1
print(f'投稿数:{count_lines}\n {table_str}\n')
投稿数(count_posts)は、ヘッダ行を除いて3つあることが確認できました。
こちらを使って改良です。
from playwright.sync_api import Playwright, sync_playwright, expect


def run(playwright: Playwright) -> None:
    browser = playwright.chromium.launch(headless=True)
    context = browser.new_context()

    # Open new page
    page = context.new_page()

    # Go to https://www.doestarian.com/python/playwright/
    page.goto("https://www.doestarian.com/python/playwright/")

    # Title取得
    title = page.locator("title").inner_text()
    print(f'Title:\n {title}\n')

    # 行数を計算
    table_str = page.locator('figure:nth-child(6) > table').inner_text()
    count_lines = len(table_str.splitlines())-1

    # テーブル情報を取得
    print('Table:')
    for i in range(count_lines):
        index = i+2
        no       = page.locator(f'figure:nth-child(6) > table > tbody > tr:nth-child({index}) > td:nth-child(1)').inner_text()
        overview = page.locator(f'figure:nth-child(6) > table > tbody > tr:nth-child({index}) > td:nth-child(2)').inner_text()
        url      = page.locator(f'figure:nth-child(6) > table > tbody > tr:nth-child({index}) > td:nth-child(3) > a').get_attribute('href')
        print(f'{no} , {overview}, {url}')

    # Close page
    page.close()

    # ---------------------
    context.close()
    browser.close()


with sync_playwright() as playwright:
    run(playwright)

できました
さいごに
いかがだったでしょうか?
単発ページならこれでとれるようになったと思います。
次回は、検索結果を使った情報取得、複数ページの情報取得、CSVリストに記載されたURLの情報取得などに紹介したいと思います。
おまちくださいませ。
(筆者の悩み:2023.4.1時点)
HTMLのデザインは頻繁に変わる可能性があります。そのたびにselectorの修正するのは面倒ですね。
Playwrightは、それらに対応できるようにpage.locator(‘table’,has_text=”自動テスト”)
など、スマートに記載できるようになってます。
ただ、URL取得部分など実装できない部分がありました。
スキルアップしてよりスマートなコードが書けるようにしたいです。

コメント